Saturday, October 8, 2011

109 - Newbie Windows 7 Starter netbook Backup and Restore

109 - A Newbie (Newb) test-drives Windows 7 Starter netbook's Backup and Restore program
====== [Sep.30.2011 written by JCPMA] ===

Windows 7 Starter® Backup and Restore
what it is used for: backing up personal data/files
ease of use: 4 (out of 5)
user friendliness for newbies: 2
documentation clarity: 1

Windows 7 Starter® Backup and Restore
what it is used for: making a system-image of a hard drive
ease of use: 4 (out of 5)
user friendliness for newbies: 1
documentation clarity: 1

Recently, I tried Windows 7 Starter Backup and Restore program. It does have some usefulness value but the user experience is poor. This program is lacking a user manual. You are left to piece together how it works and what options are available, by jumping around, it seems, haphazardly clicking on links to help-files whenever you see a link. It would be less confusing if all this information was gathered into one document. I will try to explain plainly what Windows fails to make clear.

Experience with older Windows machines.
----
My Windows 98® PC came bundled with a Seagate® backup software which I can't remember using often. It also came with Configsafe®. This program may have come with only certain brands of PCs. I don't know; But it was the program I relied on. It backed up your SYSTEM-STATE quickly and into a small file which could be exported.
Windows XP® comes with an extra feature called NtBackup® which works very well but is not enabled by default. It can save data &/or the system-state. It is reasonably fast and has size and time-remaining indicators to let you view the progress of the backup.

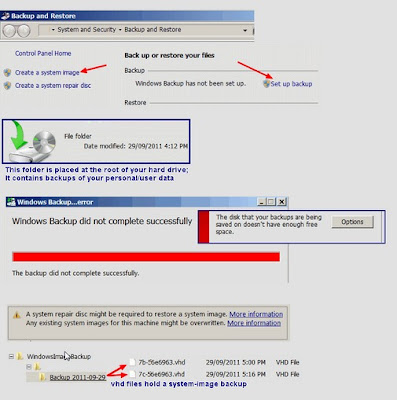
On Win7S Backup and Restore, you CANNOT backup the system-state. You can backup data &/or a system-image, ie., an image of your core drive C:\. It takes an understandably long time to backup an image. The program must compress, re-encode and verify the files. Approximately 30GB sys-image + personal files took 1 hour & 7 min. to back up. There is a progress bar, but no indication of time remaining or size expected.
Access Backup and Restore by going to your: StartMenu > AllPrograms > Maintenance > Backup and Restore. Here is the first problem. There is a another way is to go into this: ControlPanel > ... > System and Security > Backup and Restore; Here is the second problem. At this screen you have 2 choices. On the left pane is the link "Create a system-image". On the right is "Set up Backup". The left link leads to making a system-image of drive C with one or a few clicks of the mouse. The choice on the right gives an extra option of making the same image, but you can leave out some/all personal files. Both methods of making a system-image ultimately result in the same output using the same program!

The backup is saved on another internal or external hard drive at its root. You cannot choose a specific location for the target. It will be located at the root. A folder illustrated as a silver storage device will be labelled with the name/nickname of your computer. In this folder are many many zip archives of your personal data. You can accumulate more than one backup set in this folder.
Also at the root of your hard drive will be another folder called WindowsImageBackup. It contains your system-image in the form of one or two .vhd (virtual hard disk) files. These files will be huge ie., 20GB or more or less depending on your current computer system. The info in the help-file is misleading in that you can keep multiple images. This is partially true. You can keep only 1 image on 1 hard drive. If you do a subsequent backup, the image is overwritten by the most current one. You can have another image, but it has to be on a different hard drive. If you explore/check out these folders/files you will be greeted by a prompt that says "you don't have permission".

If you click on your funny-looking data folder in the root of your (external) hard drive, Windows will ask you if you want to restore your files, or all user files, or manage disk space. This is pretty straight forward. But you cannot recover your system by clicking on this icon. This icon is only for restoring files. The next paragraph summarizes the ways to recover your system from your backup.

Restoring from your system-image can be done in one of three ways:
i) using the Recovery Control Panel:
ControlPanel ... > Recovery ... > AdvancedRecoveryMethods > "use a system-image you created earlier to recover your computer"
ii) at boot up:
press F8 during bootup > Advanced Boot options > highlight "Repair your computer"
iii) reboot with a Windows installation disc OR system repair disc in the cd/dvd drive.

I tried to backup a system-image to another internal hard drive. It progressed to 12% and then the program realized there was not enough space and aborted the procedure. Well this is just an example of poor coding. Microsoft has enough money, talent and resources to design an app which can calculate/estimate space required BEFORE the backup begins. In this instance, the backup starts and has wasted the time spent up to the 12% mark.

PROS:
•pre-installed
•you have the option to make backups on demand and to turn off scheduled backups
•you can make subsequent backup sets of personal data
•other computers with Windows 7 should be able to read/recover your data if needed.
•simple one click operation
•automatic creation of system restore point when you make a system-image backup

CONS:
•difficult to navigate
•confusing interface(s) for the beginner
•you can only have one (the most recent) backup of the system-image
•you can't backup the SYSTEM-STATE/registry separately.
•you can't choose a specific target folder for the backup; it will be at the hard drive's root.
•documentation is scattered; there is no single user manual
•Backup is turned on permanently after your first use; this adds to more processes or services running in the background on your computer

"System Restore is a good feature. Why not just use that instead?" Yes it is a good feature, but every 7 days one restore point is made and if you run out of space, that means one restore point will be deleted. Also, there is no way to isolate and archive a good restore point.

Epilogue
====
Backup and Restore does have value. It is convenient. It comes ready to be setup on Windows 7 Starter. Once you get the hang of it, it is easy to do a personal data backup. However, there are many data backup/synchronization apps available which don't require installation, and don't require to constantly be run in the background. My two favorite examples are "z-Back" and "Back4Sure".
Making a system-image may be a good investment. There may be a day in which you will depend on it to recover your computer. It may save you.

My Suggestions
----
1) Make a System Restore® point now.
2) for safety's sake, use Backup and Restore to make a system-image.
3) after completion, restore back to the System Restore® point you made above. (This will effectively take you back in time to the point where Backup and Restore has NOT been turned on yet.)
4) now you have a system-image that you can store, indefinitely, for "a rainy day".

108 - Picture of Chica Umino

108 - A Picture of Chica Umino
=========== [Sep.27.2011] by JCPMA

I have a picture of the writer, Chica Umino of manga Honey and Clover.

This picture is a gif image based on a jpg photo of my own rendition of the self-portrait of Chica Umino.

107 - Newbie Password Reset Disk Windows 7 Starter Netbook

107 - A Newbie (Noob) makes a Password Reset Disk on a Windows 7 Starter Netbook
==== written Sept.25.2011 by JCPMA

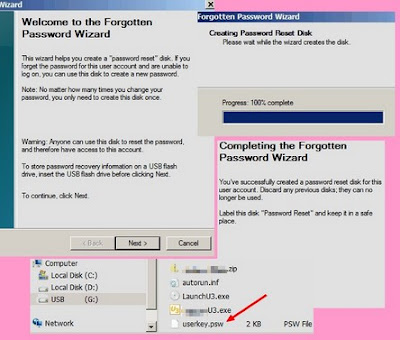
When Windows XP was young, I stumbled upon the feature "create a Password Reset Disk". I had all but forgotten about this until recently when I looked at my Windows 7 Starter netbook God-mode folder. One of the shortcuts "create a Password Reset Disk", in this folder is categorized under User Accounts. What this does is, for 1% of netbook owners is to make a floppy disk with a file unique unique to your netbook. The file is "userkey.psw" and it is 2 KB in size.This floppy disk is used so you can gain easy access to your netbook and account in the unlikely scenario where you forget your logon password. For the remaining 99% of netbook users who don't own an external floppy disk drive, this feature will create the userkey.psw file onto a USB flash drive.

Access this feature by going to: Control Panel > User Accounts and Family Safety > User Accounts > click on the left link "Create a password reset disk".

Note: You can only make 1 Reset USB disk (or Floppy disk) at a time. If you choose to make another one, Windows informs you that it will invalidate the first one that was created.

Future posts
(On previous posts I wrote "A Newbie (Noob) Uses Ten Tweaks on a Windows 7 Starter Netbook" & "Changing the color of the desktop of a Windows 7 Starter netbook")

106 - shortcut faster shutdown Windows 7 and XP

106 - Make a shortcut for a faster shutdown on Windows 7 and Windows XP
==== [Sept.27.2011]

The excerpted info from the following will tell you how to create a quicker shutdown shortcut that shout work for Windows XP as well as Windows 7:
3 Ways To Speed Up The Windows 7 Shutdown Process
posted on June 15, 2011 by Tina Sieber
http://www.makeuseof.com/tag/3-ways-speed-windows-7-shutdown-process

Create a Fast Shutdown Shortcut
As of Windows 2000, Windows has come with a remote shutdown tool to shut down and restart Windows. You can control this tool through the command line, but a much faster alternative is to create a shortcut.

•Right-click your Windows 7 desktop and select > New > Shortcut.

•Enter > shutdown.exe -s -t 00 -f in the location field,

> click Next, > give the shortcut a descriptive name, e.g. "Shut Down Computer", and > click Finish.


The letters (options) added above tell the tool to:
•(-s): shut down with a
•(-t): timeout of
•(00): zero seconds , and to
•(-f): force running applications to close without forewarning the user .

... You can see a full list of options when typing > shutdown.exe into the command prompt, which you can open via > [WINDOWS] + [R] then type > cmd into the text field and click > OK.

You can move this shortcut from the desktop to your quick launch bar or pin it to the taskbar. Double-click the shortcut to instantly shut down the system.

This trick is courtesy of Seven Forums.
http://www.sevenforums.com/tutorials/61294-shut-down-computer-shortcut-create.html
Shutdown time: 24 seconds

105 - Newbie Changes Desktop Color Windows 7 Starter Netbook

105 - A Newbie (Noob) Changes the Desktop Color on a Windows 7 Starter Netbook
==== written Sept.25.2011 by JCPMA

Many users of Windows 7 Starter netbooks will have the Windows Classic desktop theme instead of the Windows Basic. The reason is because it makes the netbook less slow. The default background color of this theme is a very lovely calm blue. This color can be easily changed to personal taste by accessing these steps: Go into your Startmenu search field and type "color scheme" > click on the resulting control panel's "Change the color scheme" > click the Advanced button > select Desktop > to the right there is a drop-down panel which lets you choose the new desired color.

I used a black desktop on all my computers, for the longest time, but this default blue on Windows7Starter is very pleasing. The reason I looked into altering this blue is because it intereferes with the Google Chrome Browser's blue. This browser has a similar but not identical shade of blue for its skin. My compromise is to alter the desktop color of the netbook slighty darker to provide enough contrast in order to identify the edges (especially the top edge) of the browser.

What About a Desktop Wallpaper?
Desktop Wallpaper feature has been removed in Windows 7 Starter. However,...
I'm not brave enough to try it, but I found what appears to be a convincing (un-official?) method of implementing a personal wallpaper on this site. http://www.howtogeek.com/howto/11243/how-to-personalize-windows-7-starter/
A commenter named bOrek on this post, April 12, 2010 3:06 am, contributed this method:
To change wallpaper you can do the following:
1. Open regedit (aka registry editor; you can access it from the star menu by typing “regedit” in the search box…)
2. Go to “HKEY_CURRENT_USER\Control Panel\Desktop\” folder and click on it
3. On the right hand side find there are a bunch of entries. Find the key named “Wallpaper” and double click on it and put the path of the picture you want as your new wallpaper (example path is “C:\Users\Bob\Pictures\new_wallpaper.jpg”)
4. Right-click on the “Desktop” folder in regedit that you found in step 2 and click Permissions.
5. Click “Advanced”
6. Go to “Owner” tab, highlight your name in the box that says ?Change owner to' ( There are only two choices the other is Administrator )… once your user name is highlighted click “OK”
7. Click on “Advanced” again
8. Uncheck the button that reads “Include inheritable permissions from the object's parent”… click “Remove” when prompted
9. Click “Add”
10. Type “Everyone” and click “OK”
11. Check Allow “Read Control” and click “OK”
12. Click “OK” again
13. Highlight “Everyone” and check to Allow “Read” and click “OK”
14. Restart Computer and enjoy new Wallpaper

My 2 cents is that you should consider the screen/wallpaper dimensions for a netbook. I think the default is 1024x600 pixels. This should be ok for most. Sometimes the netbook is run at an artificial (squished) horizon at false dimensions of 1024x768 pixels. I also read somewhere that the background should be a .jpg of less than 256 KB. I don't know if this applies to the wallpaper or if it applies to the logon screen background.

What About a Logon Screen Background?
I have not tried to change it, but perhaps the easiest way to do it is to use the tweaking app Ultimate Windows Tweaker v 2.2 by Ramesh Kumar. In the middle of the page is a button to "set custom background on Welcome Screen". It has a note about a file size less than 256 KB and a resolution of 1024x600.
This website instructs on a registry edit which will allow a change in background.
http://www.techradar.com/news/software/operating-systems/67-windows-7-tips-tricks-and-secrets-643861?artc_pg=2
22. Customise the log-on screen
Changing the Windows log-on screen used to involve some complicated and potentially dangerous hacks, but not any more - Windows 7 makes it easy.
First, browse to HKEY_LOCAL_MACHINE\Software\Microsoft\Windows\CurrentVersion\Authentication\LogonUI\Background in REGEDIT, double-click the DWORD key called OEMBackground (not there? Create it) and set its value to 1.

Now find a background image you'd like to use. Make sure it's less than 256KB in size, and matches the aspect ratio of your screen as it'll be stretched to fit.

Next, copy that image into the %windir%\system32\oobe\info\backgrounds folder (create the info\backgrounds folders if they don't exist). Rename the image to backgroundDefault.jpg, reboot, and you should now have a custom log-on image.

Alternatively, use a free tweaking tool to handle everything for you. Logon Changer http://tweaks.com/software/tweakslogon displays a preview so you can see how the log-on screen will look without rebooting, while the Logon Screen Rotator http://www.lukepaynesoftware.com/lsr accepts multiple images and will display a different one every time you log on


Future posts
(On a previous post I wrote "A Newbie (Noob) Makes a Password Reset Disk on a Windows 7 Starter Netbook.") My future posts will include the topic Making a Shortcut for Quick Shutdown of a Windows 7 Starter netbook.

104 - Newbie Ten Tweaks Windows 7 Starter Netbook

104 - A Newbie (Noob) Uses Ten Tweaks on a Windows 7 Starter Netbook
==== written Sept.25.2011 by JCPMA

My netbook is over a year old. It comes pre-installed with Microsoft® (MS) Windows 7 Starter®. And I must state I am pleasantly surprised with how well Windows 7 works on a netbook. Before writing this I had, for a long time, already customised and improved, performance by turning off Win7's visual "candy" (see item No. 5). How I got "caught up" recently in doing more tweaks started by my search to reduce the number of Windows "processes". This will be discussed below as well as other tweaks that I have tried and learned about from the internet.

1.) Recently I became overwhelmed with my obsession of viewing the MS Task Manager and its number of processes shortly after booting on the netbook. The processes number in the 50s to 60s! It bothered me for months. A significant number of these are start up processes. Michael Lin's Startup Control Panel 2.8 helps remove them, but not all. Some are locked and cannot be changed in real-time. So I began my web-crawl to find some solutions. It is funny that most articles about "tweaking" on the web discuss "turning off" Windows' features rather than using them to their full advantage. I guess like most people, speed and performance are more important to me than fancy appearances.

2.) Before continuing, if you are a newbies' newbie (noobs' noob), and tweaking is not really your fancy, then the best suggestion is to download a copy of Ultimate Windows Tweaker v 2.2. This version works for Windows 7 and probably for other recent varieties of Windows too. This is not a "plug" for UWT, but a personal testimonial. This small app requires no installation. Just go ahead and start using it. Take your time to review each option. Change the ones you feel comfortable about. For each "page" of the program, remember to click on "apply" at the bottom before you proceed to the next page of tweaks. I will talk more about UWT later.

3.) To reduce the number of startup processes, you have to access the Windows interface "msconfig". Hit the Start button > in the search field type "msconfig" > the result will include "msconfig.exe"; click on it > go to the Startup tab > uncheck the boxes of the items you don't want to run at start-up. The beautiful part about this tweak, is that it is very easy to reverse if needed.
Notes:
*There is an Adobe®..."?sth?" process here. I discovered that it makes the Adobe pdf reader quicker to launch when you open a pdf file. If you rarely/occasionaly use pdf files, then it is ok to uncheck. If you frequently use pdfs, then you should leave it alone.
*If there are audio driver or graphic driver apps at startup you should not change them. It is ok however, to uncheck their task-tray launcher apps. This will not disable the driver, but will quicken startup because one less item will be loaded into the task-tray. I unchecked an audio driver app and had some strange behavior from my sound devices. So I had to re-checkmark the box to put it back. I had not realized that this particular app had an option to disable the task-tray icon! If possible, see if you can right click on the app itself and select the option to remove its presence in the task-tray (This may not be possible with all apps). Finally, there may be startup items in the task-tray that are beyond the skills of a newbie to remove.
*A USB DVD-drive & its supporting software had been installed previously. To my dismay, the software suite inserted 8 startup items! These processes were not task-tray items but they were easy to recognize because they belonged to the manufacturer of the DVD-drive software.

4.) Services take up resources. To get access to services, go to
Start > type "services.msc". The method of changing a service is to select the particular service, right-click on it, select Properties. There is a button to click on to STOP the service. A drop-down menu lets you choose the "startup type". The four choices are Automatic-delayed; Automatic; Disable; and Manual. Several sources from the internet mention a handful(s) of SERVICES that you can stop in order to improve performance. I reviewed Tweakhound http://www.tweakhound.com/windows7/tweaking/8.html , and BlackViper http://www.blackviper.com/Windows_7/servicecfg.htm sites and came to these decisions:
*a) Cautious note: avoid tweaks in this category if you don't know what you are doing. Altering a service also changes your netbook's functionality. It is ok to leave all services alone, even though there are many of them.
*b) It is safer to switch a startup type to "manual" than to "disable"
*c) some of your settings are already (by default) "manual" or "disabled"
*d) Active X Installer - my preference for this service is "manual"
*e) Application Experience - my preference for this service is "manual"
*f) Remote Registry - "disabled" (note, this may already have been disabled because it may pose a security risk.)
*g) Windows Time - "disabled"
*h) I left this one alone: Windows Search. It is a unique part of Windows 7 and should not be resource heavy if in normal use you elect to limit the locations Windows® offers to index. (In my situation, I never ask Windows to index any of my searches or locations.)
*i) I left this one alone: Superfetch. It seems too valuable to turn off.

5.) Disable (fancy) visual effects. This category of tweaks may be the most significant enhancers of performance because visuals require diversion of a lot of computing power. In your StartMenu > right-click on Computer > Properties > Advanced System Settings > Advanced tab > click the "Settings" button of the Performance section. Choose the radio button "Best Performance" or alternately, choose "Custom" and then select 3 or 4 features you can't live without. (Personally, I like MousePointerShadows, and SmoothEdges of ScreenFonts.)

6.) Disable Aerosnap. This feature makes your windows a different size and moves them to different locations if you happen to drag a window to the sides of the screen. It is very annoying. Fixing this probably will not speed up your netbook but will make you happier. Access: Control Panel > Ease Of Access > then click on "Make it easier to focus on tasks" > uncheck the box "Prevent windows from being automatically arranged when moved to the edge of the screen".

7.) Turn off the Windows 7 Features that you don't use. Access: Control Panel > Programs > Programs and Features > "Turn Windows Features On or Off". Here, you clear the checkmarks from the boxes of items you don't want. In my case, I unchecked some of the Games, and I unchecked the Windows Gadget Platform

8.) God-Mode is a folder of shortcuts. This aggregation of shortcuts quickly direct you to the spot where you can adjust system settings. Choose a location where you want the God-Mode folder. From what I have read, the Desktop is the recommended location. Create a new folder here and give it the following name (without the quotation marks): "GodMode.{ED7BA470-8E54-465E-825C-99712043E01C}"
I learned about God-Mode from these sites: http://www.ocztechnologyforum.com/forum/showthread.php?63273-*-Windows-7-Ultimate-Tweaks-amp-Utilities-*&s=aa15af640cd8be455050932f34883dde
http://lifehacker.com/5439498/create-an-all+inclusive-control-panel-shortcut-in-windows-7

9.) Registry Tweaks. If you are comfortable navigating Registry Editor and altering registry keys, then consider the following tweaks.
*a) Shorten the mouse hover delay before the pop-up message appears. Access: Start > type in the search field "regedit" > open the Registry Editor. Navigate to HKEY_CURRENT_USER\Control Panel\Mouse. Right-click on the key MouseHoverTime and click Modify. Change the value (from the default 400) to 100 (milliseconds).
*b) Shorten the shutdown time, specifically the time taken to kill a service. Navigate to HKEY_LOCAL_MACHINE\SYSTEM\CurrentControlSet\Control. Right-click on the key WaitToKillServiceTimeout and click Modify. Change the value (from the default 12000) to 6000 (milliseconds).
*c) Shorten the menu show delay, the time it takes for a menu to activate from the instant the mouse touches it. Navigate to HKEY_CURRENT_USER\Control Panel\Desktop. Right-click on the key MenuShowDelay and click Modify. Change the value (from the default 400) to 200 (milliseconds).
*d) Shutdown's Kill App delay, and Hung App delay. These keys exist in the earlier Windows flavor, Windows XP®, but I was unable to locate them in Windows 7's registry: HKEY_CURRENT_USER\Control Panel\Desktop\. The keys are: "WaitToKillAppTimeout" and "HungAppTimeout". The default values are 20000 and 5000 ms respectively. I am not at a comfort level to manually creating new keys in the registry, so my work-around is to use the portable software Ultimate Windows Tweaker 2.2 to do this for me. Navigate to UWT's "System Performance" page, and move the sliders to the left until you get the desired values of 7000 for Killing App Time & 2000 for Killing Non-responding App Time. The desired values are approximately 1/3 of the default, but you can modify them if you wish.

10.) Enable Clear Type Font on your netbook. For me, since Windows XP, this is a major tweak for laptops and netbooks as they use LCD display screens. The Clear Type font feature offers such a large improvement in readability, I wonder why it doesn't come enabled by default. Access: Control Panel > Appearance > Adjust ClearType Text > put a checkmark in the box "Turn On ClearType". Follow the prompts and take a few minutes to fine-tune the settings. This is easy to do and only requires a one-time setup.

Epilogue
My netbook Startup processes have been reduced by 11! There are 2 fewer items being loaded into the task-tray. The time saved by the task-tray loading may not seem like much, but over the long term you save a big chunk of time and you are happier! Adobe (pdf) reader still works fast enough for my satisfaction; Alternate pdf readers are available if I am really picky about it though. My resource meters seem to be lighter but this is subjective. Objectively the tweaks don't appear to have a noticeable effect. I can't notice a quicker shutdown time. That is because, my netbook manufacturer has its own built-in software for managing shutdown & its pretty quick (slower than a Windows 98 old old old Pentium®2 computer, but faster than a Windows XP computer circa 2005.)! Before I wrote this my netbook Windows Experience Index was 2.3. This index is a score out of a possible 7.9 points. It is a miniature benchmarking feature which evaluates your netbook's strength. This reviews five elements: processor, memory, graphics, gaming graphics, and hard drive. Your Index is the lowest score of these five elements. After I applied the tweaks in this article, my Index sky-rocketed to 2.4. Ok so no big deal, but I am happier++ with the improved performance. To run this feature, access this: Control Panel > System and Security > System > click on the link Windows Experience Index > at the bottom of the screen click on "Run the assessment". It will take a few minutes to complete.
Here is a "plug" for a small resource meter. Try PESoft's TinyResMeter. Version 0.96 is simple to use. Version 0.97 has more "bells and whistles"

Sources
Many of the tweaks I learned about also came from reading these websites:
http://www.computingunleashed.com/speed-up-windows-7-ultimate-guide-to.html
http://www.ocztechnologyforum.com/forum/showthread.php?63273-*-Windows-7-Ultimate-Tweaks-amp-Utilities-*&s=aa15af640cd8be455050932f34883dde
http://www.askvg.com/master-tutorial-to-make-your-windows-7-super-fast
http://techtalk.pcpitstop.com/2009/05/26/windows-7-tweak-guide/
http://www.tweakhound.com/windows7/tweaking/index.html
http://www.askvg.com/windows-7-services-that-can-be-safely-set-to-manual
http://www.techradar.com/news/software/operating-systems/67-windows-7-tips-tricks-and-secrets-643861
http://www.blackviper.com/Windows_7/supertweaks.htm

Future posts
(On a previous post I wrote about system recovery options for a Windows 7 Starter netbook.) My future posts will include the topic Creating a Password Reset Disk for a Windows 7 Starter netbook.

103 - Warzone 2100 Manhattan Cheat Challenge

103 - Warzone 2100 Manhattan Cheat Challenge
==== [written 2011.10.01 by JCPMA]

This article discusses setting up a single player game against the computer which may be challenging especially to Warzone 2100 newbies.
I came up with this challenge to take on the 7 computer opponents. Why I had to incorporate a cheat was to even the odds. The other 7 will form alliances and share weapons research at, relative to you, an exponential rate. Without a cheat, they will quickly attack you with superior weapons.
This is how you set it up. You only have to do this once. After downloading the game Warzone 2100 Portable 2.3.3 (from Portableapps.com), start a multi-player game with the 8 player map "Manhattan" against the computer. For the game settings, allow Alliances.
Enable cheats by going into debug mode (Shift+Backspace). Use the cheat "research all". This will give you all the research available. Press Escape and save this game and give it a name you can remember. Exit. Restart the game by loading what you have just saved. Now the other 7 will gradually grow in weaponry sophistication and will form alliances to get you. You already have everything researched and can concentrate on total annihilation.
(You can play this map without the cheat, and without allowing alliances, but what fun is that?)

102 - 9 recovery options Windows 7 Starter netbook

What nine system recovery options do you have with a netbook which comes pre-installed with Windows 7 Starter operating system?
====================================== [written by JCPMA Sep.17.2011]
The most significant factor for system restoration of netbooks is that they do not have built-in optical drives, ie, CD-drive or DVD-drive. My netbook comes pre-installed with Windows 7 Starter operating system. Here are some recovery options available, some with, some without the need for an external optical drive.

1. Use the Microsoft's LAST KNOWN WORKING CONFIGURATION. Access this by pressing F8 button during the boot screen.

2. Microsoft's AUTOMATED REPAIR. If your computer has booting problems, this feature may kick in by itself and run a self-diagnostic and then prompt you to try different things. It takes several minutes or much longer++ but if it is successful it is well worth the wait.

3. SYSTEM RESTORE ("System Protection") is one of the options the Automated Repair Wizard, mentioned above, may offer you if you run into a critical booting problem. Users familiar with Windows XP will recognize this feature as "System Restore". From my perspective it looks identical to Windows XP's System Restore. (I can see no value in giving an alias of "SystemProtection" to SystemRestore; It just adds to un-necessary confusion!)
PROS
* easy to use
* at least 7 days current
* can manually configure/set a restore point anytime

CONS
* first usage requires manual ACTIVATION
* older (good) restore points cannot be kept for a long time.
* some computer power is diverted to this feature

A funny but not so funny story: This Spring, the automated repair wizard recognized a critical OS malfunction and went through all available Microsoft options to get Windows7 back to a working condition. System Restore was one such option, but when selected, Windows stated that there are no Restore-Points in the computer. It is true, that by default, System Restore is active for the netbook hard drive that contains the Windows Operating System (; see screenshot win7sysR-20110917_161636.gif below), but I found out recently, that you MANUALLY have to move a slider before it will save any RestorePoints. Under the SystemProtection tab, hit the "Configure..." button in the middle of the screen. This brings up a field where you move the slider, which is currently at 0 bytes disk space usage, to a larger number (; see screenshot win7sysR-20110917_161733.gif),. Windows help screen, "System Restore: frequently asked questions" (screenshot win7sysR-20110917_162042.gif), recommends a minimum of 300 MB. My gut instinct tells me, however, that you should set the slider for perhaps 5-10% of your hard drive space. If I activated SystemRestore on my netbook, I would move the slider to 3-5 GB!

4. The above story continues by my attempt to restoring the computer, by trying the netbook manufacturer's REPLACING WINDOWS' CORE SYSTEM FILES. This has the similar effect of reinstalling Windows.
You access this feature by pressing one of the F# keys at boot-up. Either F1 or F4 or F7 etc., "which" button depends on your particular netbook and manufacturer. Microsoft's Automated Repair Wizard has a similar feature, but it is always nice to have another choice.

5. Netbook manufacturers usually include an option to restore the hard drive to ORIGINAL FACTORY CONDITION. This option is likely the least preferred as it erases your current data. Again you access this by one of the F# keys during boot-up.

6. For lucky netbook users, some manufacturers offer the ability to create one SYSTEM IMAGE in addition to the pre-existing recovery factory system image, using the manufacturer's proprietary software. Also you would press one of the F# keys during boot to recover with this image.

7. Microsoft's SYSTEM IMAGE creation and recovery. Windows considers this as one of two Advanced Recovery Methods for more serious conditions where SystemRestore fails. You must have first though, created a system image in Microsoft "Backup and Restore". In my Start Menu I would find it under All Programs > Maintenance. Some info from Microsoft Help file, "What backup settings should I use to maximize my disk space?":
*a "full backup" is known as a "backup period";
*once your hard drive is occupied by 30% with backup system images, it starts to delete older Backup Periods;
*backups are stored on "internal or external drives or on CDs or DVDs"...

8. Microsoft's System Repair Disc. To use this option, go into "Backup and Restore" and choose "Create a system repair disc". According to the help file, "Create a system repair disc", you can make such a disc to repair Windows if you do not have a Windows Installation disc. (It sounds like this will make a System Repair CD disc or DVD disc.) You will know this feature is unavailable if during the procedure, the computer prompts you to insert a Windows Installation disc. (This is too kooky!)

9. Microsoft's 2nd Advanced Recovery Method is to Reinstall Windows. This requires a Windows Installation disc. If you click on the dialog (; see screenshot win7sysR-20110917_163130.gif), A pop-up prompt asks if you have an Installation disc, if you click "No", the recovery process is aborted.

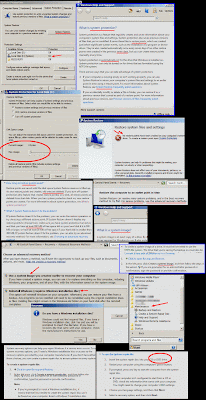
Well there you have it. Nine possibilities for restoring a netbook Windows7 system. Hopefully at least one of these will be successful for you and thus prevent you from having to have your netbook professionally restored and save you some buck$. I have not tried options 7, 8, or 9 above. If anyone wants to share their successes/experiences please drop a comment. My motivation for writing this was to sort it out, for my own benefit, as you can see it can be quite confusing. The ideal software would be one where your system image is saved to a different partition or external hard drive. A good image could be kept indefinitely and not arbitrarily erased by the backup software. Recovery would be initiated by booting off from a USB flash drive.

[In a future post, I will review Windows 7 Starter's "Backup and Restore" application as I try it out.]

101 - Life of an Averatec Laptop

101 - Life of an Averatec Laptop
A description of the history & events of resurrection of my Averatec 3250 HX laptop follows.
=== written Sept.2011 by JCPMA

[2005] I think it was in 2005 that I bought this laptop. It received good product reviews in computer magazines. I have never heard of the company Averatec, but someone had indicated it may be a Taiwan company. (Years later, I believe the internet says Averatec is a Korean company.) Browsing online product info and product features let me decide to purchase it. It is an economy/subMid-class product in a compact size. For this time period, compact laptops and laptops with smaller than 13"-14" lcd screens were not as common as they are now. This machine has a good size 500mb? memory, 80gb HD, wifi b-g card, and a dvd-burner! It comes pre-installed with OEM Windows XP sp2.

[2007 - 2008] I can not remember the year the lsass.exe boot error started. I guess around 2008. When booting, a small window shows there is an lsass.exe error. The window gives you one choice: click "OK". And, when you click OK, the laptop reboots and repeats this cycle, (much like a shampoo: wet hair, lather, rinse, repeat; wet hair, lather, rinse, repeat...). No information was found online whether this error is just a coding/software error, or if it is the result of a virus/worm. These two schools of thought cannot agree. I read somewhere that if the lsass.exe error is shown with a lower-case "l" than the problem is a glitch. If the Lsass.exe error is shown with an upper-case "L" than the issue is due to a virus.
What disappointed me was that several options of Windows XP booting wouldn't help: ie., Boot into safe mode; Boot into DOS (& even if I could boot into DOS, I am DOS-Stupid); Use System Restore; Use Windows Backup (This doesn't work as you need a working OS to do a restore); putting in a WindowsXP SP2 installation CD of which I don't have because the computer only comes with Recovery-Image-Discs.
I recovered from this error by several methods:
a) boot-option into "last known good profile" <-- this saved my bacon many times.
b) replace the corrupt registry with an older good copy using a BartPE CD in concert with ERUNT.
c) The least preferred method is to put in the manufacturer's "Ghost-like" recovery discs which will reinstall everything from scratch, and thus take your current data with it into oblivion.

[2009] The DVD-drive fails in late-2008/early-2009. Now I no longer have the use of the optical drive to recover from an error or the lsass.exe error. In the autumn of 2009, when the lsass error strikes again, I am still unable boot into Safe mode, or into a DOS-prompt. I bring the Averatec laptop to a big-name chain electronic shop. The techs say it is too expensive to replace the dvd-drive. What I could afford was to have them recover my data and reinstall Windows XP (but with SP3). The staff said future optical disc booting would be possible with an external usb dvd drive.

[2010-Spring] Seven to eight months have passed without concern and then the lsass.exe error shows its face again. An external DVD-drive was connected to the laptop. The bios however did not recognize the drive for booting purposes. I tried several variations in bios settings but with no success. It is too expensive to shell out another three hundred bucks to service this, so I put the laptop away for storage.
[2010-Summer] Using a live Linux usb stick with Ubuntu (10.04) on it, I tried booting the Averatec laptop. Again tweaking the bios did not help. The machine goes back into storage.

[2011-Summer] The big chain electronic shops do not have a laptop hd enclosure that will fit the Averatec3250HX. I went to three such shops. A medium sized computer shop DID have a suitable usb hd enclosure though. If you have not removed the hard drive from this laptop then it is quite intimidating. It involves removing about a dozen or so screws, unplugging some internal non-hard drive connections (for ease of access) and prying/lifting the front half of the keyboard laptop/plastic casing. Fortunately, some nice soul has posted a series of pictures on Flickr describing how to do this. At this stage I understand and appreciate why the computer repair techs charge an extra 25$ to access your laptop HD if it does not have a modern HD-access panel/door. (Usually these modern access panels involve the removal of only 2-3 screws!)
With the Averatec HD in the usb-enclosure I manually copy as many files as possible to an external HD. Windows disallows what it thinks are important system files in an effort to prevent piracy of its (buggy) OS. The HD imaging software XXClone recognizes the usb-enclosure as a source drive but will not see my external HD as a destination drive. I end up using DriveImageXML version2. It fails to copy the Averatec HD by "shadow copy" mode, and also fails by "locking files to copy" mode. However, it continues to copy an image to the destination external drive and it appears to work.
I restored the corrupt registry by manually (Explorer) copying an older ERUNT's registry over top of the current registry. (If you have no pre-existing backup of ERUNT registry files, try copying the 4 or 5 files in ...\WINDOWS\Repair\ to this folder, ...\WINDOWS\System32\Config\ )
Removing the HD from the usb-enclosure and re-installing it back into the laptop is just as unpleasant as removing it from the laptop! Now with fingers crossed, I tried to boot up the Averatec 3250 HX laptop. It works!

[2011-September01-September10]
*I set up another Admin Acct on WindowsXP without a password. (Could the password/login feature be something that promotes a lsass.exe boot problem?)
*Ubuntu 11 co-installed using WUBI. It seems to work, and doesn't require the hassle/knowledge of partitioning HD, or boot managers. If you are interested in boot managers, take a look at PLOP. The beautiful part of a WUBI installation is that you can access your WindowsXP HD files even though the HD is formatted as NTFS. I don't think the reverse is true however. Averatec3250HX cannot handle wubi-Ubuntu11. It seems not to have enough power to support the "Unity" theme desktop. It will repeatedly crash. Ubuntu, at this stage suggests you choose the less resource heavy "Ubuntu classic" theme desktop. This choice is better but still seems sluggish and may crash this old laptop.
*Instead of Wubi-Ubuntu11 I switch flavors to co-install Wubi-Xubuntu11. This is a less glitzy flavor of Ubuntu and Averatec3250 seems to accept it.
*A different brand of USB-external-DVD-drive than the one mentioned above was tried with some boot optical discs. It seemed to be bootable. (This DVD-Drive is externally powered and shows up in the bios as a "ramdisk cd/dvd-drive".
*puppy 5 live (Linux) recognizes Averatec's wireless card, whereas, DSL 4 (Linux) will not.
*JKDefrag3.3 is a no-install app which seems superior to WindowsXP's built-in defrag app. It defrags in 4 or more stages. Maybe it optimizes data placement better. It definitely is better as far as the GUI is concerned. Throughout the procedure you can look at the moving pixels which represent your drive's data. XP's app doesn't show a current process meter. When you are defragmenting it appears frozen and then suddenly after a long wait, it is finished. I'm not saying JKDefrag is a short process, only that the meter gives you something (animated) to look at.
*Ubuntu11-live-usb-flash-drive made with Lili-usb Creator 2.8 will boot up ok, but subsequently fails, because as previously mentioned Ubuntu11 is too powerful for Averatec.
*Windows-XP live usb flash drive made with Novicorp's WinToFlash0.7 on the Averatec fails to boot. Ironically this flash drive boots on a Windows7 machine though.
*BartPE live usb flash drive made with Novicorp's WinToFlash0.7 on the Averatec fails to boot. Ironically this flash drive boots on a Windows7 machine though.
*activate Clear Type font for the Averatec LCD screen. (This is probably the best tweak ever)
*This laptop hangs most of the time if you shut down by going into the StartMenu. This will take 1 - 2 minutes or more. If you shutdown by pressing the physical power button, shutdown is much quicker, 0.25 - 0.5 minutes or less. I try 2 apps to make shutdown quicker, but it's not apparent if anything was changed:
1) xpConfig 1.1 - by Werner Rumpeltesz
Performance Tab: boot/shutdown: change "close services on shutdown after max.: from 20000ms (20 sec) to 10000ms (10 sec).
check the box: "activate boot defragmentation" <-- (not related to shutdown)
check the box: "activate prefetching" <-- (not related to shutdown)
2) xpy 0.10.9 -
http://xpy.sourceforge.net
http://xpy.whyeye.org/
General: check the box "Enable fast shutdown"


[2011-September.11] The Registry Tweaks I applied to quicken the shutdown of Windows XP:
===================
http://www.johntp.com/2006/02/14/speed-up-windows-xp-shutdown/ From this webpage, I used instead the settings of "2000" (which means "2 seconds"):

Open REGEDIT and navigate to ‘HKEY_CURRENT_USER\Control Panel\Desktop\’
Highlight the ‘WaitToKillAppTimeout’ value.
Set it to ’1000'. [note: I used "2000"]
Now highlight the ‘HungAppTimeout’ value
Set it to ’1000' also. [note: I used "2000"]

The second part of this tip changes the same settings, this time for all users on the system.
Open REGEDIT and navigate to ‘HKEY_USERS\.DEFAULT\Control Panel\Desktop’
Highlight the ‘WaitToKillAppTimeout’ value.
Set it to ’1000'. [note: I used "2000"]
Now highlight the ‘HungAppTimeout’ value.
Set it to ’1000' also. [note: I used "2000"]

In the third part of this tip, we will alter a second registry setting to decrease the amount of time Windows XP will wait before shutting down active services after receiving a shut down command.
Open REGEDIT and navigate to
‘HKEY_LOCAL_MACHINE\System\CurrentControlSet\Control\’
Highlight the value ‘WaitToKillServiceTimeout’
Change this value to ’1000.’ [note: I used "2000"]

To allow Windows XP to close non-responsive applications automatically upon shutdown:
Open REGEDIT and navigate to ‘HKEY_CURRENT_USER\Control Panel\Desktop’
Highlight the value ‘AutoEndTasks.’
Change the value to ’1'

http://tweaks.disqus.com/shutdown_xp_faster/latest.rss
http://www.computingtweaks.com/2011/04/improve-windows-xp-shutdown-speed.html
http://blogs.howtogeek.com/mysticgeek/2009/03/12/make-windows-xp-shut-down-faster/ has similar info as johntp.com above.

http://oakroadsystems.com/
Kill Hung Processes Automatically
HKEY_CURRENT_USER\Control Panel\Desktop
Look for the value AutoEndTasks, and change it from 0 to 1.

http://windowsxp.mvps.org/slowshutdown.htm
[HKLM\SYSTEM\CurrentControlSet\Control\Session Manager\Memory Management]
Set ClearPageFileAtShutdown value to 0

http://www.optimizingpc.com/optimize/registrytweaks.html
Fix for shutting down your computer automatically
HKEY_LOCAL_MACHINE\Software\Microsoft\Windows NT\CurrentVersion\Winlogon
PowerdownAfterShutdown to 1

Fix for shutting down Windows slowly (or not at all)
HKEY_CURRENT_USER\Control Panel\Desktop
change the value PowerOffActive to 1

A faster NTFS file system
HKEY_LOCAL_MACHINE\System\CurrentControlSet\Control\Filesystem
DisableNTFSLastAccessUpdate = 1 (last file access is no longer registered)

These preceding registry tweaks, seem to quicken shutdown, but subjectively, it doesn't seem consistent. Sometimes shutdown is fast ie, 15 seconds. (This happens if the computer is on for a short time, 1-2 minutes.); Shutdown seems to take longer, however, if the computer has been on for a longer time.

======================

Where to from here?
------------------
**Now I wait for the time when the next lsass.exe error attack occurs. In the meantime I try to pay attention to do a System Restore, backup my system state using MS "Backup", and also make a current version ERUNT registry backup. Most likely a future recovery from lsass.exe error would involve: external-dvd-drive and bartPE disc + ERUNT, or copying a good registry overtop of a bad one using a Linux OS.


An unrelated note:
Jolicloud, I think is another flavor of Linux which can be co-installed in netbooks using its own Windows-installer. But perhaps the Averatec3250HX can't handle something which is obviously made for newer machines. [I haven't tried Jolicloud];
Meego, is another similar netbook Linux OS. [I haven't tried Meego]

LH!t-1816
 
*re-jcpmaone-blogger* *re-jcpma-lv-cm-histats*