Saturday, October 16, 2010

073 - How to Restore your Portable Settings on Locate32

How to Restore your Portable Settings on Locate32 version 3.1
=======

Locate32 is a file-search tool for Windows which creates indexes for fast searching.
More info is available at www.portablefreeware.com on Locate32.


Unlimited Free Image and File Hosting at MediaFire

072 - Zback v. 2.20.b Review and Tips

Zback v. 2.20.b Review and Tips
===
This is a wonderful backup & synchronization tool for Windows PCs.

Unlimited Free Image and File Hosting at MediaFire

Unlimited Free Image and File Hosting at MediaFire

071 - PaperBack v.1.0 review

PaperBack v.1.0 review by JCP
===============
.What - back up (small) files to printed paper; OR a bmp steganography app.
.who - Oleh Yuschuk
.where - http://www.ollydbg.de/Paperbak/index.html
.when - today is Sept29-2010
.why - It is a neat concept.
.how -

PROS
- small 227KB; - Portable!; - v.innovative! -password encryption available!

CONS
- not practical for large size files:
(132kb jpg file : 3/4 page : 14.5mb bitmap);
(3 bytes txt file : 1/8 page : 2.2mb bitmap)
[ (3 bytes txt file : 1/8 page : 1.12mb bitmap) <== at extreme settings.] - need a nice printer and scanner - version 1. backs up 1 file at a time.

Unlimited Free Image and File Hosting at MediaFire


myNotes
~~~~~~~
IdealEquipment = 600dpi LaserPrinter; Scanner with 900dpi+ real resolution.
Inkjet printer limitation = maximal useful resolution 200dpi

You can save a file to a bmp by using "save to bmp" in the file menu.
Drag and drop is supported. But dropping a bmp will activate recognition/recovery.

Do not convert resultant bmps to other than 8bit-color, or recovery will be impossible.

Much thought went into coding this app. For example, Encryption algorithm,
drag&drop feature, Redundancy for correcting errors; Paper formatting; Data compression


Options:
~~~~~~~
Printing Options are:
Dot Density: use (120 or) 150 dpi. You store more data on a sheet of paper
with a higher dpi, but at the expense of requiring a nicer printer, and also a nicer
scanner for recovery of data. At 150 dpi setting, the programs suggests for recovery,
that you scan at a physical resolution of 450 dpi. Also, a higher dot density means a
smaller bmp file.
Dot size: author suggests 70%. The reason is that some white space around
the dot will help scanner recognition/dot distinction.
Compression: author suggests Maximal, unless you have a slow computer.
Redundancy: 1:5 means app's recovery algorithm allows 1 data-block to be
recovered, rebuilt in case of error for every 5 data=-blocks which are printed.
A smaller ratio, ie 1:10 would mean your resultant bmp or # of sheets to be printed
would be smaller. A higher ratio, ie 1:2 would mean your data is more safe. (For
my tests, i used 1:7)
Header and Footer: This option allows descriptive info for human eyes.
Border Around The Page: This should be checked; This improves autocropping
by twain drivers.

Decoding Options are:
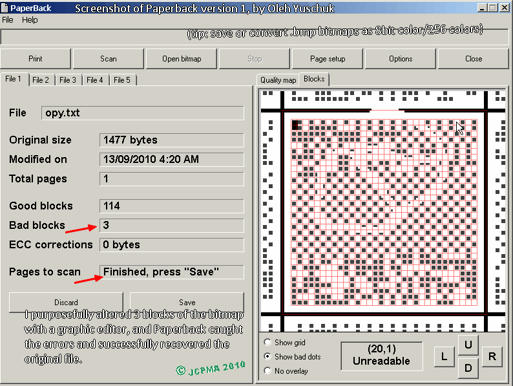
Autosave complete files: when scanning multipage files, Paperback recognizes
the completion of scanning and prompts you to save your file.
Determine Best Quality: slows down recovery, but the app works better to
analyze and repair data.

Encryption Options are:
Encrypt data: This activates encrypting the backup.
Password in open text: whether or not pw is shown as you type it

MyResults (with MD5 checksums)
~~~~~~~~~
jpg0 = original file to be backed up. It is a 132 KB jpg image.

jpg0.jpg 132 KB (136,165 bytes) 4d8c2b60bdc77345b801b57a0573943c
jpg1.jpg 132 KB (136,165 bytes) 4d8c2b60bdc77345b801b57a0573943c
jpg2.jpg 132 KB (136,165 bytes) 4d8c2b60bdc77345b801b57a0573943c
jpg3.jpg 132 KB (136,165 bytes) 4d8c2b60bdc77345b801b57a0573943c

bmp1.bmp 14.5 MB (15,218,038 bytes) 8bit color baf58cb7192043ce31d9c8f58a3b98b5
bmp1.bmp.zip 449 KB
bmp1.bmp.jpg 8.88 MB (9,312,597 bytes) 8bit color
bmp1.bmp.jpg.zip 715 KB
bmp1.bmp.jpg.gif 3.39 MB (3,562,963 bytes) 8bit color
bmp1.bmp.jpg.gif.zip 3.39 MB
bmp2.bmp 14.5 MB (15,218,038 bytes) 8bit color b3373776f8c93f3515fb1cbbd7c30a15

bmp3.bmp 14.5 MB (15,218,038 bytes) 8bit color 8ca1d7f0431db0ff853f414e78151c8e

backup jpg0 file took 1 sheet of paper and filled up 3/4 of a page with dots.
backup jpg0 file with encryption took 1 sheet of paper and filled up 3/4 of a page with dots.


Explanation of results:
~~~~~~~~~~~~~~~~~~~~~~
My Printing Options used for the test:
DotDensity - 150dpi;
DotSize - 70%;
Compression - Maximal;
Redundancy - 1:7
Header & Footer - Yes;
Border Around the Page - Yes

Backing up the 132KB original file by saving to bmp resulted in a bmp file ("bmp1")
14.5MB with dimensions of 4192x3630 pixels at 8bit-color depth.
Next, I converted bmp1 to bmp1.jpg 8.9 MB, and then this I converted this to
bmp1.jpg.gif 3.4 MB. (Interestingly, zipping bmp1 gives you a zip file 449 kB). I
converted bmp1.jpg.gif to bmp2 and proceeded to recover the file. It worked perfectly.
The resultant jpg file, jpg2.jpg is identical to jpg0.jpg

Backing up jpg0.jpg using encryption to bmp3.bmp gave a bmp with identical size and
dimensions as bmp1.bmp, 4192x3630 pixels at 8bit-color depth. The MD5 hash was different
and visual inspection of the bmp image showed the dots were placed differently. Recovery
of this backup was successful: jpg3.jpg is identical to jpg0.jpg.

070 - Back4Sure - ScreenShots Tips

Back4Sure - ScreenShots Tips
===
Here are some tips for Back4Sure version 3 backup program for your files.
It is portable and works on Windows.
You can read more about it at www.portablefreeware.com

Unlimited Free Image and File Hosting at MediaFire

Unlimited Free Image and File Hosting at MediaFire

Unlimited Free Image and File Hosting at MediaFire

Here is a copy of the pics as a zip archive http://www.mediafire.com/?c371kleeg469hbf
http://www.mediafire.com/file/c371kleeg469hbf/Back4Sure-TutorialPics.zip

md5 checksums
-------------
1-Back4Sure-tutorialMain.png,dc8fe0f5f51cff2586c9571d2a9d6167
2-Back4Sure-MiddleTabs.png,eeca20639bea29f1f7353fd46322fd43
3-Back4Sure-ActionsTab-other.png,1f12034703a7a442ef7b24f5225b5c7a

069 - Initial Setup for Bluetooth Phone PC Data transfer

Initial Setup for Bluetooth Phone PC Data transfer
===

Background: I have pics etc on my phone that I want to transfer to a PC using the PC's Bluetooth transceiver.[Oct.2010]
This blog post, is written from memory, as I only has a short opportunity to try a Bluetooth enabled computer. It illustrates the steps to expect when PAIRING a DEVICE and the steps to expect when sending a file(s) between PAIRED DEVICES.


My friend's PC has Bluetooth. Having never used Bluetooth before, I went through the required settings in order to transfer a file to the PC, and subsequently, in the reverse direction, a file from the computer to the phone.

I right-mouse-click on a small text file on the PC, and then from the context menu, clicked "SendTo Bluetooth". A Windows® Bluetooth Wizard starts and tells you to proceed. When I continued, Windows immediately indicated Bluetooth was not available. So, after consulting the Windows Help feature, and a long time of trial & error, I remember ending up in the ControlPanel and finally enabling the PC's Bluetooth. ... To make a long story short, the PC needs to be configured to recognize and connect to your cell phone, & similarly, your cell phone needs to be set up to recognize your PC. During this process, Windows self-installs Bluetooth drivers specific to your cell-phone model.

In Jargon, this is called a setting up a "PAIRED DEVICE":

Main steps for the Cell phone:
- Navigate to your phone's Bluetooth section and turn it ON.
- Create your phone's unique (Bluetooth) NAME. (Usually there is a factory preset name, but you can change/tailor it to your own taste)
- Change the phone's Bluetooth visibility setting from Hidden to VISIBLE.
- Go to the phone's PC Data Transfer/Data Sync setting; from here, create your USERNAME, and your PASSWORD

Main steps for the PC:
- ENABLE/activate Bluetooth on PC
- use the Bluetooth Wizard (or ControlPanel?) to SEARCH for active devices (ie search for your Cell phone)
- From the list of Bluetooth devices found, choose and CONNECT to your phone
- enter the (cell phone's ) PASSWORD into the PC
- when prompted by your phone, enter the cell phone's PASSWORD in to your phone.

---note re: PASSWORD. Some phones appear to like numeric passwords over alphabetic character passwords. I don't know why that is.

Results:
---
I sent a small text file,"abc.txt", from the PC to the phone via the context menu "SendTo Bluetooth" selection. If I were prompted, (I likely had to) Accept the connection, once on the PC and once on the phone. Then I had to when prompted, enter the PASSWORD, once on the PC and once on the phone.
I received a note in my phone, (not my text message inbox). The note had no file name, but upon saving it, the phone used the content of the text file as the name of the note. The content/body of the the text file was accurate. [I don't know if this would work for unicode characters. In my test, the test file contained ANSI characters.]

Next, I sent a picture, a .jpg file from the phone to the PC. The phone prompts you to choose from your list of "Paired Devices" for the name of your PC. It asks you to enter the PASSWORD. The PC says a file is being sent (to the PC/itself) and also asks for a PASSWORD. Again, you enter the same one as discussed above. The PC receives the jpg but it stores it in a unique folder, not on the desktop.

Saturday, October 9, 2010

068 - Preferred Way of Dealing with Pictures on Blogger

My preferred way of dealing with pictures on Blogger

I haven't blogged for a while & had forgotten how un-fun (not fun; unenjoyable) it was to add a small/medium sized picture to a Blogger post.

Yesterday, I uploaded some small pics for a tutorial to Blogger. The pics have small print on them.
When I finished the post. I realized that clicking on the pictures would not enlarge them to their normal size nor any larger size. So, today, I had to upload the same pictures to another webservice. (I used Photobucket.com). Next I painstakingly linked the Blogger pics to the new Photobucket links. Coding, even simple html coding, is not that fun. It took some time but I finished it.

Blogger uses its sister-site Picasa.google.com to handle posted pics. You get 3 choices of picture size when you upload; they are small, medium & large. I used "large" in this example, and it wasn't big enough to my liking.

Another reason which frustrated the process, is that adjusting the placement of photos/pics on your post is very non user friendly. The editing "Compose" window is small, and "dragging" your pics, especially large pics to another area on the blog is very difficult, if not impossible. I ended up moving 3-4 pics successfully by dragging; the remaining 2 that I had to move was done by using the "Edit Html" window.

Here's the suggestion of this post.
  • Upload your pics to another web-service if you have more than 2-3 pics.
  • Make sure the web-service has either hot-linking or webpage/blogpage friendly embeddable links
  • The ones I like to use are:
- Photobucket.com
- Tinypic.com
- Mediafire.com
I heard Flickr.com is a good one to use; You need to have/open a Yahoo account to use Flickr.

Friday, October 8, 2010

067 - Toucan Backup Tutorial Pictures

Tutorial Images for Toucan v. 3.0.3 backup and synchronization software.
Here are the lost pictures from the User Guide.


[Late entry: October09-2010: unrelated -- I just spent a fairly long session, editing this blog page and its picture formatting. The images you see on this screen have been cross-referenced to link with Photobucket(R). I chose to do this because, the pictures I uploaded to Blogger won't display any larger when you click on them.]


archive copy of tutorial is at http://www.mediafire.com/?wssog8blp53my

zip archive of pictures http://www.mediafire.com/?lhg0cfp8lml2ali

checksums.md5.txt http://www.mediafire.com/?774midwhp0qfiu7

 
*re-jcpmaone-blogger* *re-jcpma-lv-cm-histats*